Monday, August 29, 2011

Blue Bandana

The second challenge I completed for the August 2011 Virtual Stamp Night at Splitcoaststampers.com was Dusty Trails. We were challenged to use a bandana print technique as well as paper piecing to create a card.

You can check out the gallery for this awesome challenge here. I strayed a bit from the beaten track, and used the theme as my guide, rather than going for a truly authentic bandana look.


Here I stamped the Medallion image with Not Quite Navy Craft ink directly onto this piece of Well Worn dsp, then embossed with clear ep to help the image pop off of the background.

I incorporated paper piecing by using the retired SU! stamp set Polka Dot Punches. This fits in pretty well with the bandana look, I think. I stamped the flower image in Cajun Craze ink onto another piece of the Well Worn dsp, then punched out with the coordinating 5 Petal Flower Punch.

To finish the card, I creased the petals a bit with my Bone Folder and added an Antique Brad to the center of one. I distressed the edges of the Well Worn dsp and sponged Cajun Craze, Soft Suede and a bit of Not Quite Navy inks on the edges and over the Medallion image.

Hope you like what I came up with. Give it a try!

Faux Leather (Masking Tape) Technique

I was inspired by the video tutorial on Splitcoaststampers.com by Beate Johns for the Faux Leather technique using masking tape. This past weekend was another SCS Virtual Stamp Night (VSN) set of challenges. The theme was Rodeo.

I didn't think I would get a chance to play at all, since I had to work on Saturday at the Great Minnesota Get Together. This afternoon, though, I pulled out some of my toys and managed to complete 5 of the challenges! It helps that there is a 45 minute time limit, but I was way under that for almost all of my cards. I think I used the full 45 minutes for this Dragon Skin card, though.


I used my newest stamp set, Dinoroar, which I got for my youngest. I think it is pretty cute! (Even if this image is of a flying reptile, not technically a dinosaur.)
I also took advantage of the current (until Wednesday 8/31) offer from SU! of buy 3, get 1 free on Designer Series Paper. I used the Well Worn dsp on this card and also on several others I made today.

Here's a quick tutorial for this method of Faux Leather.

1) Cover a piece of card stock (doesn't matter what color) with small pieces of masking tape. Try to cover any straight edges with a ripped piece.


2) Add a dark brown (here Early Espresso) ink to the torn edges of tape by rubbing a sponge across the surface.


3) Sponge a lighter shade (here Soft Suede) over the top (don't rub) to add color to the centers of the tape pieces.


4) Cover the sheet with clear embossing powder and heat set. (I noticed that some of my tape pieces curled up during the heating process, but I could easily push them back down when the piece had cooled.)


5) Finish the project! I ran my faux leather piece throught the Big Shot with the Top Note die to make the background for the pteranodon. He's stamped with Cajun Craze ink on Very Vanilla card stock. I used my Paper Snips to cut him out, and sponged the edge with Soft Suede ink.

There is more sponging around the edge of the dsp background (from Well Worn), and the card base is Cajun Craze. On the inside, I stamped the T. rex and a bit of the grass.


I'm planning on featuring this technique at the September meeting of my Techniques Club. Contact me if you are interested in joining. We have room for you!

Tuesday, August 23, 2011

Sunset on the Farm


Anyone who has stamped with me knows that I love sponging. It is easy, fast and cheap. It also gets your fingers dirty.

These cards use both the Farm Life stamp set from Stampin' Up! and also a John Deere tractor stamp I have from a different manufacturer.

Colors are Cajun Craze, More Mustard, Wild Wasabi and Very Vanilla. I also added Daffodil Delight, So Saffron and Elegant Eggplant inks. Both images are embossed with black ep.

Tuesday, August 16, 2011

Embrace Life

A tried and true stamp set: Embrace Life. I used it a few weeks ago to make some Get Well type cards for my parents to use. I took the colors from the CreativeCrew Challenge over on Splitcoaststampers.


Here I've used the poppy image with Baja Breeze, So Saffron and Poppy Parade. I ran the card stock mat through my Big Shot with the Vintage Wallpaper embossing folder. Don't you love the deeply embossed image?

The image is stamped with Basic Black and colored with a Stampin' Write Marker (Poppy Parade) and a Blender Pen (with a So Saffron pad). I used my (retired) Coluzzle to cut the circles. SU! has a neat new tool, the Circle Scissors Plus, that allows you to create a mat of just about any size you want. With my old tool, I'm limited to 1/4 inch.


I went to town on the inside with the stamping and coloring. That was fun! Also, I had to pull out my Stampin' Sponges to soften the edge of my circle.

The sentiment is from With Love & Caring.

This second card used the bamboo image from Embrace Life as well as the sentiment from that set. The Spotlight Technique is a quick way to add some color and dimension.


I used the Square Lattice embossing folder for the texture on the Poppy Parade accent here. I find that the card stock shortens up slightly when using the embossing folders, so I trimmed this piece to match the card front length exactly after running it through the Big Shot.

Tuesday, August 9, 2011

Birthday Buddies


I made a few birthday cards with this fun new stamp set, Barnyard Buddies.

Here I stamped the tractor image in four different ink colors (Soft Suede, Night of Navy, Poppy Parade and Pear Pizzazz). I popped each 1 1/2" square up for dimension, and also added scored lines behind the images. The greeting is from the retired Wow Flowers set, and is attached to the card front with Linen Thread and a Mini Library Clip.


I went moved to a circle design on the second card. The pig is stamped in Soft Suede ink, and I layered the 1 1/4" Circle Punch over the Scallop Circle (that's Night of Navy again--SU!'s darkest blue). The Very Vanilla circle behind the image is the largest circle from the Circles 2 Die. I used the Color Spritzer Tool to add some Pear Pizzazz splash. The Poppy Parade accent strip is dry embossed with a Texturz Plate and my Big Shot.


I kept the circle theme going on the inside of the card. Poppy Parade is a good barn color, I think.


The images in this set are a nice combination of realistic but cute. I think I will have a lot of fun using this set to make cards and scrapbook pages for many different occasions.

I earned both the Barnyard Buddies and Love & Sympathy stamp sets free when I hosted my own Club meeting in July. Stampin' Up!'s new Hostess Rewards allow you to "spend" your rewards on any products, including exclusive Hostess-only stamp sets. To be honest, I wasn't sure I'd like the new system, but I have to say I'm pretty happy with how it has worked out for me so far.

If you would like the chance to earn some free stamps, card stock, inks or embellishments, let me know! We can set up a low-key Workshop in your home.

Inside Out Joseph's Coat Take 2

I wanted to give the Inside Out Joseph's Coat technique another try. We learned this technique at the July meeting of my Stamp Club.

Stamp a detailed background stamp on neutral card stock using either Basic Black or StazOn black ink. Here I've stamped En Francais in Basic Black Classic Ink. Sponge up to three Classic ink colors over the background stamp. Cover the whole piece of card stock. This project has Pink Pirouette, So Saffron and my new favorite color Wisteria Wonder.


Clear emboss a solid image stamp over the card stock. I got my Hostess Rewards today, and that meant two new stamp sets to play with. This pretty flower image is from the new sympathy set, Love & Sympathy.


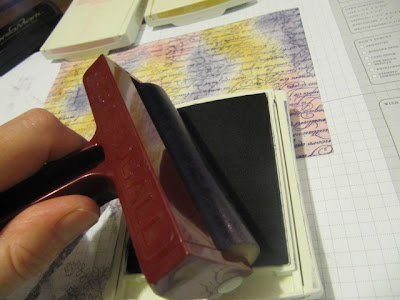
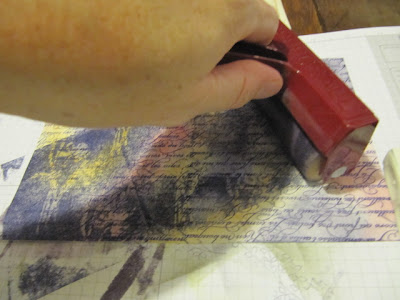
Bray the entire piece of card stock with a dark Classic ink color. I used Concord Crush.


Use a very slightly damp paper towel to remove the ink from the embossed portions of your panel. The dark ink should rub off easily, revealing both the bright colors and the detailed background image underneath.


Finish your card!


The new year of Stamp Club will start in September. We still have room for two or three more stampers. Please contact me if you are interested; I'll be happy to answer any questions you might have!

Tuesday, August 2, 2011

Sew Suite

Last night I pulled out my Sew Suite stamp set and the Sweet Stitches dsp, and made a set of cards. I wanted a design that was both uncluttered and quick, and I'm happy with the result.

The first card features the dress form stamp. With the clear mount stamps, it is really easy to center the image on the card stock, and I had no trouble placing the sentiment just where I wanted it.


For a quick variation, I turned the Very Vanilla image panel to accommodate the slightly longer "congratulations" sentiment.


On the inside I used the "If at first you DO succeed, try not to look astonished" stamp from Full of Life. You never know when someone will do something great, and it is good to be prepared.

Stampin' Up! has a big variety of double sided designer papers, and they're all on sale in August. Buy 3, get one free. You can browse and order through my website.

Thanks for checking out my blog, and happy stamping!